Friday, 14 January 2011

Final Post

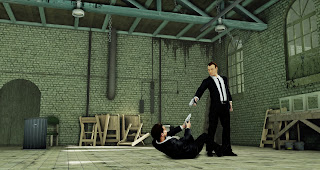
In Game Beauty Shots

The first shot is situated as your character enters the room, this would be at the start of the conflict between the two characters.
The second shot is a little later in the scene, where your character has approached Mr Pink and Mr White, but they are still aiming their guns at each other, whilst arguing. 

Model Sheets

Annotated Shots 


Saturday, 11 December 2010

Skin Shaders

The past few weeks work on this subject has dwindled a touch, but for good reasons. I have entered a character modelling competition that required a great deal of work. Because of this I have had no updates to this project, and therefore did not feel the need to post. To make up for this, I will be creating 2 extra posts for the missed weeks, filling you in on my workflow.

So, as I stated above, there has been little work going on on this subject, due to the Dominance war preliminary competition putting it on hold. However, one thing that I have looked into is the use of a sub surface scattering effect shader for the UDK. This shader if implemented correctly will give the material that are skin in my models a much more realistic skin affect! I have not had time to implement it on my own models.


Here a few shots of the shader in action, as you can see, it is not the perfect skin shader, but does create a very nice effect when you consider that it is a real time shader.

Work on this project will start up again after this week is over, and work will continue again at the same rate it did at the start of this project. I am still feeling very confident that the work that I will achieve at the end of this project will be of a very high quality, and will learn a great deal both skill and practise wise because of this project.

Friday, 19 November 2010

Alpha Presentation

This Tuesday we gave our Alpha presentation, If I am honest I felt it could have gone a lot better, but did not go terribly. I made a quite substantial mistake by using a version of UDK that was newer than the Uni build, meaning we had to rely on screen grabs, a lot of which we of an older version of the set-up. However, one thing I notice was that we actually seem to be a bit further alone our production plan than other people, this however may be due to being one of the only groups, and that the scene lacks the complexity of other students.

For the presentation I actually managed to get my characters posed, and had a lighting and post processing set up done. This was a lot of work, but I think it was definitely worth it, as it gave a lot more depth to the scene than It would have had if I had just placed "A" posed characters in a scene without any decent lighting set up.

The next milestone is mid January now, this is the milestone for the final complete version of the scene. I am going to carry on at a steady pace until that date, but will probably slow down from the pace I have been going at, as to dedicate time to other modules that need some love.

Heres a few shots of the scene as it was for the presentation:


Friday, 12 November 2010

Head unwrapping and retopology

Work is continuing at a steady pace, this week I have focused on the retopology of the head mesh, and getting basic textures on it for the alpha presentation.  I have come across a few small problems, which have been rectified in a somewhat makeshift way. The main one is to do with unwrapping heads, this process can be done very easily by simply drawing a seam in Roadkill and letting it works it magic. However, I find the resulting unwrap is useable, but the texture space is not actually used to its fullest, and the distribution of UV's although pretty even, is not ideal. The way I see it, the best way to layout a head would be to have the face taking up a proportionately larger space than the normally do, and the face should have as little stretching on it as possible. I am going to talk to my tutors about this and see if they can offer any tips on how to best layout a head unwrap.


Here is a screenshot of the heads UV sheet at the moment, this will be changed after alpha, but at the moment it will do.

The next thing was the texturing, as this is a model of Steve Buscemi's head, It needs landmark parts of his face in the texture. This is very hard to do without being able to magically travel back in time to the set of the film and take reference images of him. The way I plan to tackle this is to work with a few different techniques. Firstly, I am going to put together a poly painted version of the texture, this will be a good starting point for colours and shading, I will then overlay some real skin and hair textures, and finally put AO passes onto the texture, hopefully these techniques together will give me something that resembles Steve Buscemi, without actually having any pictures to take textures from.


For the Alpha, I have thrown together a relatively quick poly paint, and projected some skin detail, this will not be the final texture. The normal maps and AO passes still have some artifacts, but I don't think its worth fixing this as they will be reprojected when I re-unwrap this at a later date anyway.

This Tuesday we have our Alpha presentation, for that date, I will hopefully have 2 posed characters, and have sorted a good lighting setup in UDK.

Friday, 5 November 2010

Baking?... Is this a 3D model, or a Pie!?

The time has come to start baking. Unfortunately I am not baking delicious cakes, but instead normal maps. This is a process that I still feel that I need more practice at. At first glance normal baking seems simple - Insert High Poly, Insert low poly, press button, hey presto.  Unfortunately it doesn't seem to be that simple. There are more factors involved when baking out normal maps for a character model. I use a bit of software called xnormal, this software takes a high poly model that would be practically impossible to import into maya, and then projects its details onto a low poly models UV sheet. However I have found out that this isnt as simple as loading in the whole model of each and hitting go. I have had to split the models into sections, and then bake the map for that section, for example the Shirt is one object. This gives much better normal maps, but also takes a lot of time.

So, I got the first pass of the normal maps for the whole body model done, here is the sheet:


I then started to lay down a first pass on the textures. This is a rather un-detailed pass, just an ambient occlusion and a few material patterns overlayed. I also discovered that using the green layer of the normal map can help add detail to a texture.

Here is the texture so far:


This is what they look like in action on the model:


There are a few re-bakes of the normal maps that need to be done, but I think that this level of detail on the texture will do for the alpha presentation on the 16th. By then I need to have Buscemi's head retopologised, UV'd and a first texture pass done, the poses done and have it placed in udk. I am on track for getting this done, and might have even got the sculpt of Harvey Keitel's head started.

Friday, 29 October 2010

Retopology!

Over the past week I have been retopologising the body for the reservoir dogs characters. This is quite a laborious process, but is not overly taxing, just time consuming if you want to do it to a high standard, which I do, obviously! My technique when it comes to retopology it to first use poly paint to draw topology onto the mesh, and then use the ZBrush retopology tools to create a new mesh over the existing high poly mesh. When doing this it is very important to make sure I pay a great deal of attention to silhouette of the high poly, and make the low poly follow the silhouette as closely as possible. This has been rather easy task with this model, as there are no major extrusions of the form to worry about. I actually managed to get a retopology of the whole body that was around 4100 polygons, however I think I am going to up the subdivision on a few components and then reduce them in Maya, aiming for a poly count on the body of around 9000, allowing for 2000 for the head if needed.

Shot of the mesh as it is in its low poly form.

The next stage after this was to project the details from the high poly onto the new low-poly mesh. This process can get hellish, and I seem to learn a bit more about the approach each time I do it. I think that a mistake I made this time was that I use the extrusion tool to create the clothing, this works great, but it makes detail transfer a pain. A better way to do this would be to make a hole-less mesh and use that to generate the initial high poly, then retopologise  the whole mesh, not just the parts that need to be seen and project the detail from that on then just trim out excess details later in maya. This will probably give a much more accurate projection without any of the strange artefacts I was getting. An easy way to explain it is to say, I want to make a t-shirt, instead of modelling it with space going through the centre, I will model it as if I am chiseling it out of a block of clay, and not hollowing the inside out, whereas what I did was make it with the centre taken out, like a real shirt would have.

The next stage was to create the UV's. For this I used Roadkill. Roadkill has become a massive part of my pipeline for unwrapping anything organically shaped. It turns a job that could take hours into one that only takes a third of the time, and gives great results too!


UV sheet for the model.

Over the next week I hope to get the texture done for the suit, and have it re-proportioned to fit Mr. Pink's body shape. I'd also Like to have the Mr. Pink head retopologised and UV'd too.
Saturday, 23 October 2010

Teeth and Shoes...

This week has been about teeth and Shoes, and a few revelations about keeping a stock file of generic objects that can be re-used wherever necessary. As such I have decided that It would be a good idea to start building things a little more generically. By this I mean that I am going to start making versions of Items that are less specific to the current project. The teeth I made this week are a good example of this. I used reference of dentures and dental diagrams to build average set of adult teeth, and then created polygroups within Zbrush that allow me to edit each tooth individually. The implications of this are that I now have a set of adult teeth and gums that can be manipulated to look like the subject that I wants teeth.


The other thing I worked on was the shoes, I have decided to take a bit or artistic license with the shoes as they are quite boring in the film and I wanted to give them a little more detailing. Here is a shot of the progress so far.


The way I am approach the modeling of these 2 characters has changed over the past week. I was originally doing it as an action shot sculpture. But I have instead decided that It would be more efficient time-wise to have the two characters modeled standing then pose them as if they were rigged using the transpose tool in zbrush. The initial plan would have given more visually appealing results, but it would also have been something I would have found myself explaining in interviews as to why I modeled them in a pose, as that is not good practice in the games industry. I may pursue the idea of extra detailing in a plain sculpt as I want a model to have a 3D print of, and I think this would make a great piece.

Over the next week I aim to have the body detailed and the retopology done. From there I can go on to finishing the Buscemi head and retopologising that, then onto Harvey Keitel.